

How To Draw Jordans Step By Step Slowly
Discover how to draw a landscape with painterly style in this art demo that takes you from rough sketch and initial concept to final artwork.

In this demo, you'll discover how to draw a landscape with painterly style. Follow along with artist-instructor Phil Metzger to learn how to "lift out" clouds, substitute trees to get the look you want, adjust your values, and more.
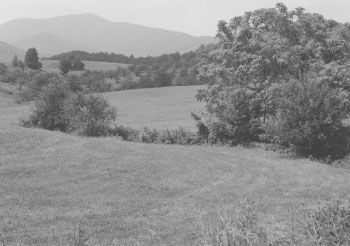

1. Select a reference photo and make a quick sketch.
When I begin, I have in mind drawing the landscape pretty much as it appears in my reference photograph (above), but I make a quick sketch and see that there are problems: 1.) The tree on the right is an uninteresting blob; 2.) the tree is the same height as the distant mountain, causing too much symmetry; 3.) the foreground and the sky in my sketch seem too nearly equal in size and shape.

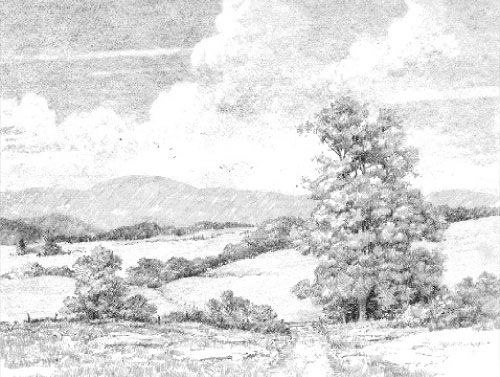
2. Substitute the tree.
I find this taller tree in my box of photos. Its broken shape is better and has more visual dimension and visual interest than the one in my first reference photo. Its height allows me to let it thrust into the sky to provide additional visual interest. As I add the tree and make the sky proportionately larger in the picture frame to accommodate the tree (see image 3), I solve the problem I mentioned earlier — the equal sizes of sky and foreground. But now I have a lot more sky to deal with. That's where clouds can come in.

3. "Lift out" the clouds.
I think the sky is too large an area to be left all white, with no action at all, so I decide to experiment. I make the sky in the sketch gray with the flat of a 2B pencil and then "lift" (erase) clouds from the gray using a plastic eraser. I like the effect and decide to go ahead with it in my drawing.

4. Do the outline drawing.
Here is the final outline drawing on Strathmore bristol plate-finish (smooth) paper. I haven't drawn in any cloud formations because I want only soft edges in the clouds. I'll create the soft edges later when I form the clouds by lifting them with an eraser from a darkened sky, as I did in my previous sketch.

5. Lay in the sky.
I use paper with a plate finish to help achieve a smooth sky. I begin by carefully laying in a flat value for the sky, using first HB and then 2B pencils held flat against the paper. I start with the sky because if I make a mess of it (by not getting the sky smooth enough) and have to discard the drawing and start over, I won't have wasted work done on the trees and fields.

6. Form the clouds.
I begin forming clouds by erasing, dabbing with a kneaded eraser and pressing more firmly with a plastic eraser. I'll leave the clouds as shown here, only partly formed — it's difficult to see at this stage just how far to carry them. Later, when the rest of the landscape is developed, I'll be able to better judge how much further to carry the cloud rendering.

7. Mask for the horizon.
I draw the most distant sections first and work my way forward. I leave the distant mountains undefined and hazy for an atmospheric effect. At this point, I keep the fields white because, until I establish the tree lines, I'm not certain how dark I should make the fields. To get crisp edges, I cut curves along the edges of an index card and then use the card as a mask. I use such a mask, for example, to draw the distant mountain. In that case, I place the card-mask against the sky while I draw the mountain using hatched HB pencil strokes. The mask helps me avoid having stray strokes intrude into the sky area. In other areas I use drafting tape as a mask, twisting or cutting it into the shapes I need (as shown above).

8. Hatch in the trees and bushes.
Leaving the fields white, I begin drawing the rows of trees and bushes, first hatching with an H or an HB pencil and then hatching and crosshatching with a 2B. The sun is at the left, so the lighter hatch marks (facing left) will represent the sunlit portions of the foliage. I begin laying in the big tree in the same way, using hatching with an H pencil as a starter.

9. Finish the main tree.
It's time to get serious about the main tree. I continue filling out its form with H and HB hatched strokes. Over those strokes I hatch and crosshatch B and 2B strokes, trying for a convincing suggestion of foliage textures. Remembering that the light is coming from the upper left, I gradually darken the right side of the tree as well as the undersides of foliage masses. With more pressure, I use a slightly chisel-shaped 2B pencil to draw the darker "holes" in the foliage. I hatch the lower trunk area with light HB chisel strokes and then draw the trunk negatively — that is, by darkening the spaces around the trunk. Higher, where the trunk and branches are seen against the light sky, I draw them positively with HB strokes.

10. Begin the foreground.
I complete the tree and begin work on the foreground, using HB and 2B strokes to suggest grasses and a few rocks, a fence, gate and path. I erase more graphite from the sky to enlarge and whiten the clouds. I also create some horizontal streaks with a kneaded rubber eraser to help enliven the sky.

11. Adjust the values and shapes.
Once the foreground is done, the fields seem too bright (they look snow-covered), so I tone them down with the flat of an H pencil. With various pencils, adjusting values and shapes, I add little touches all over (contours in the fields, fence lines, grass textures in the foreground, birds in the sky) for my finished drawing, Sky and Fields.
More Tips for How to Draw a Landscape with a Painterly Style

When using flat strokes, do the following:
- Rub the lead briefly against scrap paper after each sharpening to remove any coarse grains of graphite that may cling to the lead as a result of the grinding of the sharpener.
- Use light pressure to avoid dark edges to your strokes. Gently increase pressure to get a gradual darkening of the area you're working on. This takes some practice.
- Lifting graphite to make clouds is easy — so easy you might get carried away! Go slowly. You can always lift a little more later on.
- If the area you want to mask is plain white paper, you may use an index card or tape as a mask. But if the area to be masked has graphite on it (as the sky does in this example), don't use tape because removing the tape would also remove some graphite.
- The rows of trees and bushes may be too small in height, compared to the white areas. It's easier to make them larger later than to start them too large and then have to erase.
- If the area to be masked already has graphite on it (like the sky in this example), don't use tape as a mask because removing the tape would also remove some graphite.
- Before using any kind of tape, it's a good idea to try it out first on a scrap of the paper. Some papers are so fragile that removing even a "gentle" tape will tear the paper's surface.
- Try for a good balance between detail and broad treatment in the foliage. I could draw in such minute detail that I get a near-photographic look, but I prefer a rendering in which many individual, fairly bold strokes are visible. In painting, this approach would be called "painterly."
Definitions
- Masking: any material (tape, cardboard, index card, etc.) used to protect an area of a picture from pencil marks, paint, etc.
- Hatching: a means of creating a tonal or textural effect by using a set of repeated and parallel horizontal, vertical or diagonal lines, usually closely spaced.
- Crosshatching: a means of creating a tonal or textural effect by using a set of repeated and parallel horizontal, vertical or diagonal lines laid at an angle over another set of parallel lines.
For this drawing, we used these art materials:
- Pencils: Staedtler Mars Lumograph H, HB, 2B, B
- Paper: Strathmore bristol, plate finish, 8×10
- Tape: Scotch Removable Magic tape or drafting tape (tape that's less sticky, for masking)
- Erasers: kneaded eraser (soft, rubbery substance that can be stretched into desired shape); Pink Pearl eraser (for tougher erasing jobs); plastic (vinyl) eraser
- Other: Index cards (used as erasing shields), spiral-bound sketchpad (will lie flat)
This article is excerpted from Phil Metzger's book,Pencil Magic: Landscape Drawing Techniques.
How To Draw Jordans Step By Step Slowly
Source: https://www.artistsnetwork.com/art-subjects/landscapes/how-to-draw-a-landscape/
Posted by: lynnfouty1959.blogspot.com
0 Response to "How To Draw Jordans Step By Step Slowly"
Post a Comment