

How To Create Datasource In Weblogic 12c
Oracle WebLogic Server 12c: Configuring a JDBC Data Source
<Do not delete this text because it is a placeholder for the generated list of "main" topics when run in a browser>
Purpose
This tutorial shows how to use the Oracle WebLogic Server 12c administration console to configure a JDBC data source.
Time to Complete
Approximately 1/2 hour
Overview
A data source is an object that enables a Java Database Connectivity (JDBC) client to obtain a database connection. The data source has a collection of database connections called a connection pool. An application can request a connection from the data source, use the connection to access the database, and then close the connection. Rather than actually close the connection, however, the data source places it back in the connection pool to be used again. Data sources can be created as part of the configuration of an instance of WebLogic Server. When that server comes up, (or the data source is deployed), the server creates database connections to fill the connection pool of its data source.
This tutorial covers using the Oracle WebLogic Server 12c (12.1.1) administration console to create a data source and its connection pool. The connections are to an Oracle Database.
Software Requirements
The following is a list of software requirements:
- Oracle WebLogic Server 12c (12.1.1)
- Oracle Database 11.1 or 11.2
Note: In this tutorial Oracle Database XE 11.2 is used.
Prerequisites
Before starting this tutorial, you should have completed the Oracle by Example tutorials titled Oracle WebLogic Server 12c: Installing WebLogic Server and Creating a Domain and Oracle WebLogic Server 12c: Configuring Managed Servers.
Setting Up the Schema in the Oracle Database
To set up the database schema required by the JDBC client application, perform the following steps:
| . | Download the jdbc_obe.zip file to the machine where your WebLogic Server domain and servers are. Extract the file contents to a local drive. In this tutorial, the files are extracted into the /home/oracle/jdbcobe/testds directory. The zip file contains three files:
|
|---|---|
| . | Log in to the system as the user that started the Oracle Database. Open a Terminal window and navigate to the location of the SQL script file, testds_oracle.sql. In this tutorial that is: $ cd /home/oracle/jdbcobe/testds Make sure that the database environment variables are set by printing them out: $ echo $ORACLE_HOME Note: The values of your environment variables may be different. If there are no values printed, then set the variables to the proper values with: $ export ORACLE_HOME=valid_value Then invoke SQL Plus as the sysdba user: $ $ORACLE_HOME/bin/sqlplus / as sysdba |
| . | Connect to the database as the system user. You can give the password and the name of the database as you connect. In this tutorial the command is: SQL> connect system/oracle@XE Then run the SQL script with this command: SQL> @testds_oracle.sql The script, testds_oracle.sql, creates a user called PBPUBLIC with the password PBPUBLIC. It grants that user the abilities to create sessions, tables, and so on. It then connects to the database as that user and creates three tables: EMPLOYEE, WLS_CATALOG_ITEMS, and WLS_CLIENT_INFO. Finally, it inserts rows into those tables and exits. |


Starting WebLogic Server
To start the administration server and the dizzy1 managed server of the domain, perform the following steps:
| . | If the administration server of the domain is not already running, it needs to be started. To start it, in a Terminal window, navigate to the domain directory, and enter the command: $ ./startWebLogic.sh When prompted for a username and password, enter the credentials of the domain administrator. |
|---|---|
| . | The managed server dizzy1 should also be running. If it is not already running, start it. In another Terminal window, navigate to the domain directory, then cd into the bin subdirectory. Enter the command: $ ./startManagedWebLogic.sh dizzy1 http://host01.example.com:8001 This runs the script to start the managed server named dizzy1. Also notice the argument that gives the URL of the domain's administration server: Note: Use the host name and port of the administration server of your domain. When prompted for a username and password, enter the credentials of the domain administrator. |


Configuring a JDBC Data Source
To configure a JDBC data source by using the WebLogic Server administration console, perform the following steps:
| . | After the servers are up and running, access the WebLogic Server administration console. Open a web browser and enter its URL: In this tutorial, that is: http://host01.example.com:8001/console Note: Use the host name and port of the administration server of your domain. On the Welcome screen, log in using the Username and Password entered to start the servers. |
|---|---|
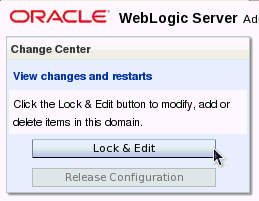
| . | Creating a data source is a change to the domain's configuration, so the configuration must first be locked. In the Change Center, click the Lock & Edit button. |
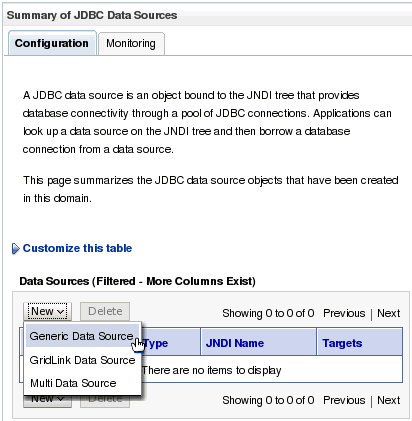
| . | In the administration console under Domain Structure, expand Services (by clicking the + next to it). Then click Data Sources. |
| . | On the right, notice that the Summary of JDBC Data Sources section appears. Under the Data Sources table heading, click the New drop-down list. Then select Generic Data Source. |
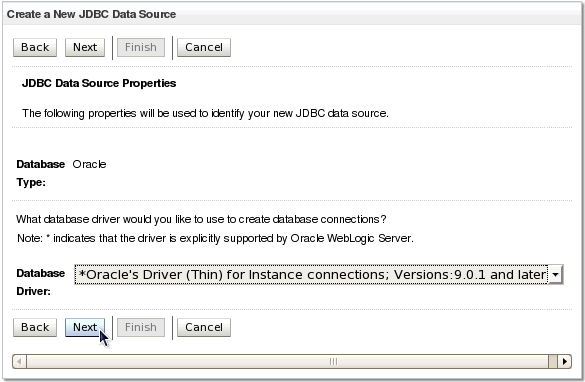
| . | On the first page of the Create a New JDBC Data Source wizard, enter the Name of the data source as dizzyworldDS. Enter the JNDI Name of the data source as dizzyworldDS. Note: There is no requirement that the data source name and the JNDI name match. The JNDI name is the one to make note of, because it is used by JDBC clients to access the data source. Use the Database Type drop-down list to select Oracle. Then click Next. |
| . | On the second page of the wizard, use the Database Driver drop-down list to select Then click Next. |
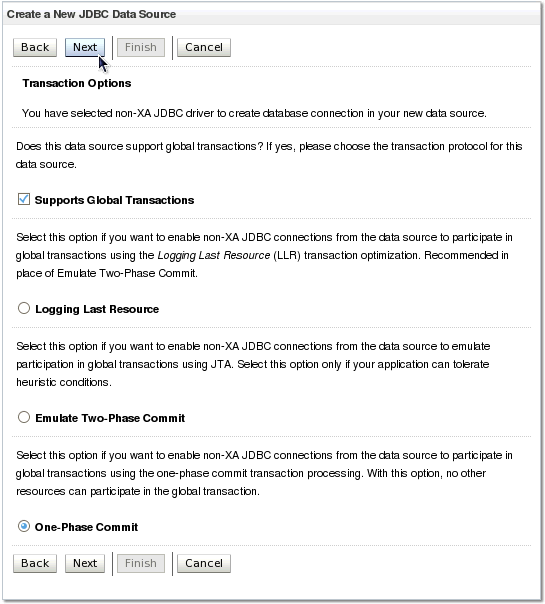
| . | On the next page of the wizard, keep all the default Transaction Options, and click Next. |
| . | On the next page of the wizard, enter the Database Name. In this tutorial it is XE. Your database name may be diffrerent. Enter the Host Name of the dizzy1 managed server. In this tutorial it is host01.example.com. Use the host name where your dizzy1 server resides. Leave the database Port at the default of 1521. (Unless it is different for your database.) Enter the Database User Name of PBPUBLIC. This is the user that was created by the SQL script. Enter the database user's password twice, in the Password and Confirm Password fields. The password is PBPUBLIC. Then click Next. |
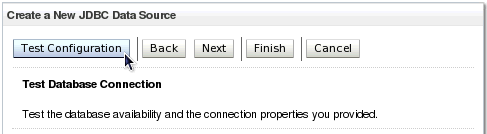
| . | On the next page of the wizard, click the Test Configuration button to check if a connection to the Database can be made, based upon the information entered. |
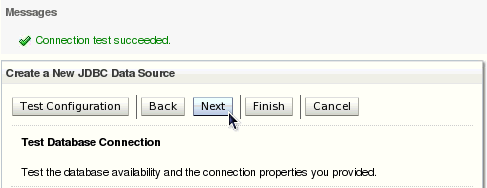
| . | If the message "Connection test succeeded" is displayed, click Next. If the connection test fails, use the Back button to review the entries made for the data source and correct any errors. If there are no errors in the entries and the test still fails, make sure your database is running. |
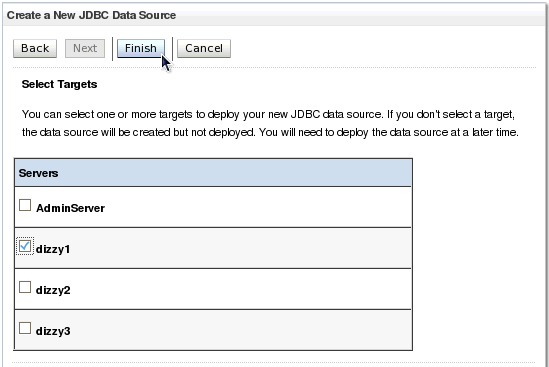
| . | On the last page of the wizard, the data source is targeted. Targeting a data source to a server means that the server will manage that data source and it will be available as one of the resources of that server. Select the check box next to dizzy1. Then click Finish. |
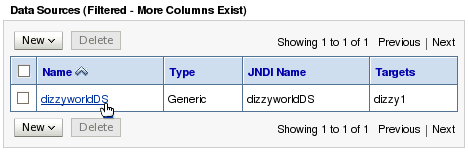
| . | In the Summary of JDBC Data Sources area, in the Data Sources table, the new data source, dizzyworldDS, is listed. |
| . | To modify the configuration of the new data source, click its name, dizzyworldDS, in the table. |
| . | Under the Settings for dizzyworldDS, click the Connection Pool tab under the Configuration tab. |
| . | Scroll down to find the "capacity" fields. For Initial Capacity enter 2. For Maximum Capacity enter 10. For Minimum Capacity enter 2. Then click Save. The message "Settings updated successfully" is displayed. |
| . | In the Change Center click the Activate Changes button. The message "All changes have been activated. No restarts are necessary." is displayed. |
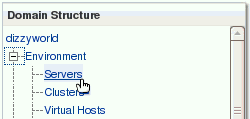
| . | Under Domain Structure, expand Environment and then click Servers. |
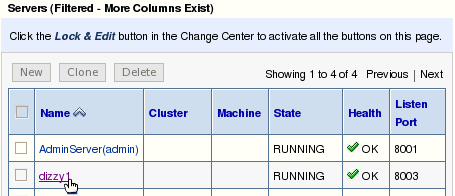
| . | In the Servers table, click the server dizzy1. |
| . | In the Settings for dizzy1, under the Configuration tab and the General subtab, click the link View JNDI Tree. |
| . | The JNDI tree opens in a new browser window (or tab). Notice that dizzyworldDS appears in the JNDI tree. Note: Other entries in the JNDI tree of your server can be very different from what is shown here. It all depends upon what resources your server has. |


Testing the JDBC Data Source
To test the JDBC data source with a simple web application, perform the following steps:
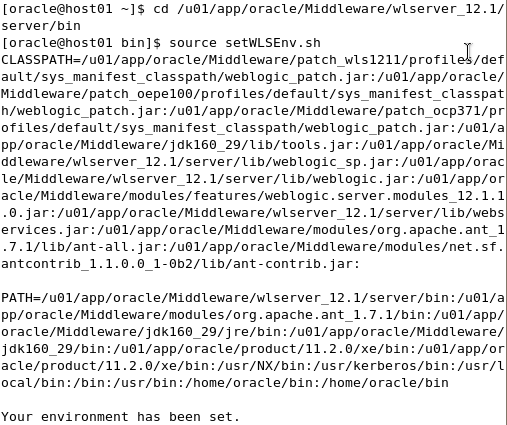
| . | Open a new Terminal window and navigate to the /server/bin directory under the WebLogic installation directory. In this tutorial, that is: Then run the setWLSEnv.sh script as follows: $ source setWLSEnv.sh This will set the PATH and the CLASSPATH so the WLST deployment script can be executed. | ||||||||
|---|---|---|---|---|---|---|---|---|---|
| . | Next navigate to the directory where the testds.war file resides. This file was part of the zip file extracted earlier. In this tutorial, the zip file was extracted into the /home/oracle/jdbcobe/testds directory. | ||||||||
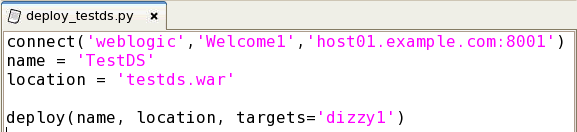
| . | Before running the supplied WLST script, deploy_testds.py, you may need to edit it. The first line of the script uses the connect() command. The first argument of that command is the domain administrator's username, the second argument is that user's password, and the third argument is the host and port of the administration server of the domain. Make sure the values for these arguments are correct for your domain before running this script. Make any changes required to the script, and save the file. | ||||||||
| . | Run the deploy_testds.py script to deploy the web application in the testds.war file and target it to the dizzy1 server. Do this by entering the following command: $ java weblogic.WLST deploy_testds.py You should see a message that the deploy operation has succeeded. Note: You can ignore the warning about Context.close(). That warning is always displayed when running a WLST script and is not an issue. | ||||||||
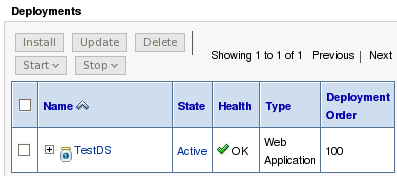
| . | To verify the deployment was successful, go the the administration console, and under Domain Structure, click Deployments. Then in the Deployments table, find TestDS with the "Active" State. | ||||||||
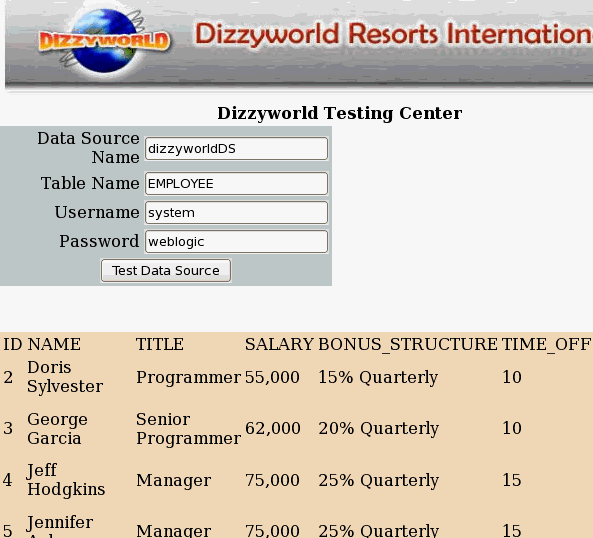
| . | To use the deployed application, in another web browser, enter the host and port for the dizzy1 managed server, followed by /testds. In this tutorial, the URL entered is: When the application comes up, enter the following:
Then click the Test Data Source button. | ||||||||
| . | The rows in the EMPLOYEE table are displayed below the fields. The application uses the Data Source Name entered (dizzyworldDS) as the JNDI name to look up the data source from dizzy1, retrieves a database connection from that data source, and executes the SQL to select all the rows in the table entered in the Table Name field (EMPLOYEE). If you want to test the data source again, try a different table in the Table Name field. The other two tables are WLS_CATALOG_ITEMS and WLS_CLIENT_INFO. |


Summary
In this tutorial, you learned how to:
- Run a SQL script to set up a schema in an Oracle database
- Start instances of WebLogic Server
- Configure a JDBC data source by using the administration console
- Test that data source by using a simple web application
Resources
- For documentation on Oracle WebLogic Server 12c, visit the Documentation Library.
- For more information on creating JDBC data sources, see the Configuring and Managing JDBC Data Sources document.
- To learn more about Oracle WebLogic Server, refer to additional OBEs in the OLL website.
Credits
- Lead Curriculum Developer: Bill Bell
- Original OBE Created By: TJ Palazzolo
![]()
How To Create Datasource In Weblogic 12c
Source: https://www.oracle.com/webfolder/technetwork/tutorials/obe/fmw/wls/12c/04-ConfigDataSource/configds.htm
Posted by: lynnfouty1959.blogspot.com
0 Response to "How To Create Datasource In Weblogic 12c"
Post a Comment